Meta Box WordPress Plugin Review: Nifty & Easy For Custom Posts & Fields (2022)
Are you curious about extending WordPress and bending it to your will? Do you want to know how to completely take control over how data is stored and displayed on your WordPress site?
If so, you’re in luck! In this post/tutorial, I will steadily guide you through how to implement custom fields, custom post types, and custom taxonomies in WordPress.
I’ll first discuss what exactly custom fields and post types are, how to implement them without a plugin, and then introduce you to a plugin that truly raises the bar called Meta Box, where I’ll then uncover how you can easily add custom post types, custom fields, custom taxonomies, and display them on WordPress.
So, let’s get started!
Video Review
What Are WordPress Custom Fields?
Custom fields in WordPress allow you to add additional information to a post or page you are editing.
Whenever you write a new post, page, or any other type of content, WordPress saves it in two separate areas.
The first part is the body of your post, which you add with the post editor.
The second part provides information about that content. This includes the title, author, date, and time. These bits of information are called metadata.
It automatically tags each post or page you create in WordPress with the appropriate metadata.
By using custom fields, you can also create and store your own metadata.
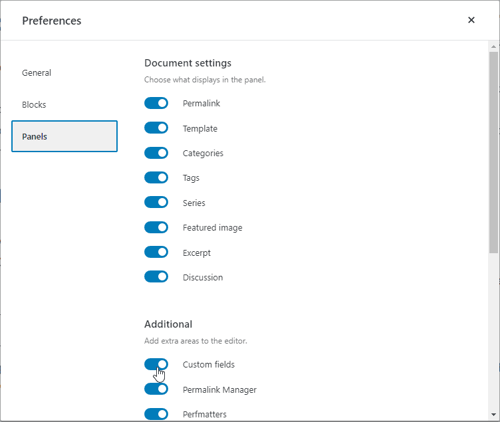
On the post edit screen, the custom fields option is hidden by default. In order to view it, click on the three-dot menu at the top-right corner of the screen and select ‘Preferences’. Then click on “Panels” and finally, you’ll see an option to toggle custom fields on or off.
After toggling custom fields on, the page will reload and then you’ll find the “Custom Fields” section at the bottom of the page.
Now, please remember that custom fields and custom post types can get pretty complicated and are typically reserved for developers; however, I promise you that by the end of this post you’ll firmly understand the inner workings and need not be a developer in order to use WordPress to its full potential!
How To Add New Custom Fields without a Plugin
The first step is editing the post or page where you want to add the custom field and then navigating to the custom fields meta box.
You will then need to enter the name and value of your custom field. Save it by clicking the Add Custom Field button.

The field saves its value and displays it in the custom fields meta box table.
You can edit the custom field at any time, and then you can save the changes by clicking the Update button. You can also remove a custom field if you find it unnecessary.
Your custom field settings are now saved automatically when you save your post.
How To Display WordPress Custom Fields without a Plugin
You will need to edit your WordPress theme files in order to display your custom field on your website. I know that sounds scary, but it’s not as horrible as it sounds!
The first thing you’ll want to do is locate the theme file you need to edit to display your custom field. I would recommend that you start out by experimenting with displaying it on a single post page. So, look for either the single.php or content-single.php file.
Without delving into the exact details, look for something like below, which is what they refer to as a WordPress Loop.
<?php while ( have_posts() ) : the_post(); ?>
You want to make sure that you add your code before the following line:
<?php endwhile; // end of the loop. ?>
Now you need to add this code to your theme file:
<?php echo get_post_meta($post->ID, 'key', true); ?>
Don’t forget to replace the key with the name of your custom field.
<p>Custom Field: <?php echo get_post_meta($post->ID, 'custom_field', true); ?></p>
You can now save your changes and visit the post where you added the custom field to see it in action.
Now you can use this custom field in all your other WordPress posts as well.
Simply create a new post or edit an existing one. Navigate to the custom fields meta box and select your custom field from the drop-down menu and enter its value.
Click on the ‘˜Add Custom Field’ button to save your changes and then publish or update your post.
Use Cases for Custom Fields
The above showed how to add one custom field to an existing post type (so, most likely, a page or post).
Keeping that in mind, why would you want to add a custom field for a post?
One suggestion would be to have a custom field for the SEO Title of a post or the message that gets shared when someone shares your post on social media. If you’re using a plugin like Rank Math then you can easily incorporate custom fields into it. With Rank Math, you could either have a Schema Template, or you can add a Code Snippet and add a filter to their rank_math/json_ld method, and reference your custom field as %customfield%. That’s it!
What are Custom Post Types in WordPress?
For most entrepreneurs out there, when they start off with WordPress for their business, they think they’re locked into either a “standard” page or a post. This can be somewhat off-putting, especially if you’re in a specific niche, such as a chain of restaurants, for example.
So, if you have a chain of restaurants, you could create pages for each one and have to apply the same layout on every page.
“Ut oh, I want to change the layout!”
Now, you’ll have to go through each restaurant page manually.
There has to be a better way, right!?
Thankfully, that’s where custom post types come into play!
How To Create a Custom Post Type without a Plugin
First, while you can perform the below code in your child theme’s function.php (please always use a child theme), I would recommend using Code Snippets as that would allow you to change your theme without losing functionality.
By the way, I know I haven’t spoken about child themes before, but let me first state that I honestly believe Astra is the best WordPress theme out there and they even have an online Child Theme Generator.
Ok, now onto some coding. Create a new snippet using the Code Snippets plugin, and place something similar to the below:
add_action( 'init', 'register_restaurants_post_type' );
function register_restaurants_post_type() {
	$args = [
		'label'  => esc_html__( 'Restaurants', 'text-domain' ),
		'labels' => [
			'menu_name'          => esc_html__( 'Restaurants', 'mydomain' ),
			'name_admin_bar'     => esc_html__( 'Restaurant', 'mydomain' ),
			'add_new'            => esc_html__( 'Add Restaurant', 'mydomain' ),
			'add_new_item'       => esc_html__( 'Add new Restaurant', 'mydomain' ),
			'new_item'           => esc_html__( 'New Restaurant', 'mydomain' ),
			'edit_item'          => esc_html__( 'Edit Restaurant', 'mydomain' ),
			'view_item'          => esc_html__( 'View Restaurant', 'mydomain' ),
			'update_item'        => esc_html__( 'View Restaurant', 'mydomain' ),
			'all_items'          => esc_html__( 'All Restaurants', 'mydomain' ),
			'search_items'       => esc_html__( 'Search Restaurants', 'mydomain' ),
			'parent_item_colon'  => esc_html__( 'Parent Restaurant', 'mydomain' ),
			'not_found'          => esc_html__( 'No Restaurants found', 'mydomain' ),
			'not_found_in_trash' => esc_html__( 'No Restaurants found in Trash', 'mydomain' ),
			'name'               => esc_html__( 'Restaurants', 'mydomain' ),
			'singular_name'      => esc_html__( 'Restaurant', 'mydomain' ),
		],
		'public'              => true,
		'exclude_from_search' => false,
		'publicly_queryable'  => true,
		'show_ui'             => true,
		'show_in_nav_menus'   => true,
		'show_in_admin_bar'   => true,
		'show_in_rest'        => true,
		'capability_type'     => 'page',
		'hierarchical'        => false,
		'has_archive'         => true,
		'query_var'           => true,
		'can_export'          => true,
		'rewrite_no_front'    => false,
		'show_in_menu'        => true,
		'menu_position'       => 5,
		'supports' => [
			'title',
			'editor',
			'thumbnail',
			'custom-fields',
		],

		'rewrite' => true
	];

	register_post_type( 'restaurant', $args );
I know this probably looks like gibberish to a non-developer, but if you read through it, you’ll see that it’s not that bad to get you started.
In the code above, we’re creating a new post type that acts as pages do, but it would appear as “Restaurants” in your WordPress Admin Dashboard. It would support the ability to have a title, the editor, a thumbnail, and custom fields.
Displaying custom post types manually can be rather cumbersome.
For the sake of brevity, if you wanted to change the layout of your “Restaurant” post type, the first place I would look is in your theme’s single.php file.
WordPress has a way of determining which file to render based on post type. So, if you were to create a single-restaurants.php file, it would you that file as the template to display your custom post type.
Similarly, if you changed the above code to act more like posts and had an archive, you could create archive-restaurants.php.
You can read more about this on WordPress’s Developer site about working with custom post types.

Using Meta Box for Custom Fields & Post Types
Before, I showed you how to manually add custom fields and custom post types to your WordPress setup, hoping it would help you understand what happens “behind the scenes.”
I know with me, understanding the “inner workings” of things helps me ultimately make better decisions, which is I eventually caved and purchased Meta Box.
Think about it: how much have you ever wanted to create your own WordPress “blocks” or “sections” or “views” but had to resort to installing yet another specific plugin or writing your own code?
Well, Meta Box allows you to do just that: create custom post types, add custom fields to practically anything, create custom blocks or views, and so much more.
So, please allow me to do a brief overview of Meta Box, the one plugin that has replaced many for me.
Meta Box Pricing
As of this post, you can grab Meta Box for either $49/year, $99/yr, or $299 for the lifetime bundle.
Don’t make the mistake I did and purchase the Basic Bundle hoping I could pick which Pro extensions I wanted, as that’s not the case. To really get the most out of Meta Box, you need the Ultimate Bundle, don’t worry… it’s worth it!
Why Choose Meta Box over Advanced Custom Fields, etc?
Well, while the concept of adding custom fields and custom post types to WordPress has been around for a long time, Meta Box has made the process much simpler, also while giving you much more control.
For example, Advanced Custom Fields (ACF) is practically the “original” custom fields plugin for WordPress. However, in my experience, ACF isn’t necessarily the easiest to use and they don’t support creating custom post types and custom taxonomies like Meta Box.
According to Meta Box, they “support extra UI for other features like custom post types, custom taxonomies and views that ACF doesn’t.”
This can be both a good and bad thing, as it makes Meta Box much more powerful and can make it seem overwhelming at first.
Other plugins I considered were Toolset and Custom Post Type UI.
However, I feel that Meta Box offers the “full package” for a reasonable price if you’re patient enough to learn how to use it.
The Meta Box Admin UI Delivers
This sets Meta Box apart from other plugins that offer similar capabilities. I can tell that they’ve thought through the user interface (UI) and user experience (UX) thoroughly.
Take a sneak peek…
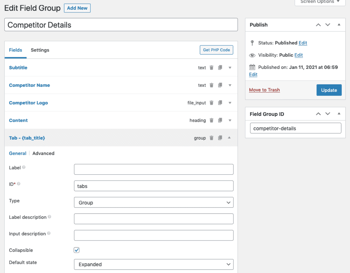
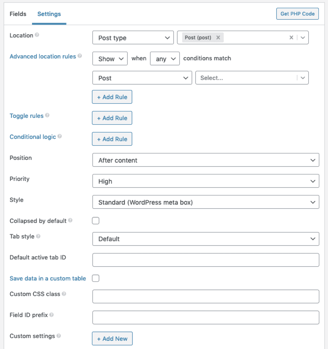
Meta Box Custom Field Editor Builder


As you can see from the video and screenshots, creating custom fields with Meta Box may seem overwhelming with the number of options you’re given, but I recommend you take time and play around and learn about what each configuration means.
Later, I’ll show you some examples of how I use Meta Box to replace two plugins that I was previously paying for.
Meta Box Custom Post Type Builder
Creating a new post type is fairly straightforward, and it’s easy to update it in case you make a mistake the first time around.
One feature that I didn’t see in other plugins was the ability to create custom post types that differed from my blog URLs (called “permalinks”).
Here’s what I mean: WordPress allows you to define a base “path” for your blog. In my case, it’s ajtatumdigital.com/blog/. With most other plugins, when you’d create a new post type, it would append the name, so you’d have something like “/blog/restaurants/” which wasn’t what I wanted.
Meta Box allows you to easily control this behavior by toggling the “Prepended permalink structure” slider under the Advanced tab. So, if it’s not checked, you’d just have ajtatumdigital.com/restaurants/.
Managing Custom Taxonomies in Meta Box
The default taxonomies in WordPress are, for example, a post’s categories and tags. So, categories can be hierarchical (think, parent/child relationship) or you can have tags that stand on their own.
With that in mind, as you can see from the video, creating your own taxonomy for existing post types or custom post types is much like creating a custom post type.
What Else Can Meta Box Do?
So, by now you know that Meta Box is more than competent in creating custom post types, custom taxonomies, and custom fields for WordPress, but it offers a great deal more through its extensions!

I’m not going to go in-depth on all the extensions Meta Box offers, that’s for another blog post.
However, in the theme of this post, they offer a “Relationships” extension which allows you to link two different post types together. For example, you could have a custom post type of “Artist” and then another for “Albums” and with their Relationships extension, you can link those two post types together!
The extension I’m going to showcase next, which will show how you can easily display your new data, is called Meta Box Views.
Meta Box Views: A Powerful Template Editor
Now, armed with the knowledge of how to use Meta Box to create custom fields, please allow me to show you how you can display those custom fields through Meta Box Views in the video below. Enjoy!
Meta Box: One Plugin To Replace Many
As I mentioned earlier, I don’t want to veer too off course from this post’s topic, but I figure it’s worth highlighting at least some other really nice extensions that come with Meta Box, some of which can replace plugins or prevent you from buying new ones!
- Meta Box User Profile: This extension allows you to create register, login, and edit user profile forms anywhere on your site with a shortcode. I experimented with this extension and thought it was well executed, but since I’m already “invested” in Gravity Forms registration and profile forms, I stuck with them.
- Meta Box Integrations: They integrate well with Rank Math (my favorite SEO plugin), Yoast SEO (another popular SEO plugin), Elementor (my favorite page builder), Beaver Builder/Theme, SearchWP (an outstanding WordPress Search replacement plugin), and FacetWP (making custom fields searchable and filterable).
Now Your In Control of Your WordPress
I know this has been a long post, but I thank you for sticking with me; reading along.
Please take my advice and learn from me: I messed up more than once with Meta Box and asked a ton of questions on their support forums when I decided to actually start using their Views extension.
If you’re interested in seeing the source code for the views I’ve done, you can check them out on GitHub!
If you’d like some guidance with your WordPress setup, remember that I offer free virtual consultations to see if I can be of any help to you and your business.
As always, please comment below, rate, and share this post with your colleagues!
Thanks for reading,
AJ


